David's Astronomy Pages
|
Introduction |
Home Page |
Observatory Design & Construction |
|
|
Clair Observatory is a wooden shed construction 6' 6" x 6' 6" , with a
roll-off roof. It is located in the back garden of our home which lies around 12 miles north of Aberdeen. The site has good sky
access. The site
suffers only minor local light pollution.
The observatory has been sited at it current location since 2004 (Clair Observatory 2004-2008). It has been built using the same shed and pier that were used at my two previous observatory sites (Kingcup Observatory 2001-2003 and Hilltop Observatory 1998-2000). The observatory was refiitted with a new sliding roof in February 2009 in order to permit the installation of a new taller telescope (a 12" LX200 with larger diameter tube and longer fork arms mounted on a new larger equatorial wedge). The new roof is some 35 cm taller than the original flat roof and is open at one end to permit the roof to slide over the telescope. The open end of the roof is closed by means of a hinged gable flap attached to the end wall of the observatory. The sliding roof runs on casters along the low and high walls of the observatory onto two wooden run-off beams that are permanently supported by external posts. Rain-boards on either side of the roof ensure that the roof remain held on the wall and runoff beams. When closed the roof is held fast from within using a combination of flexi-ropes and locks.
|
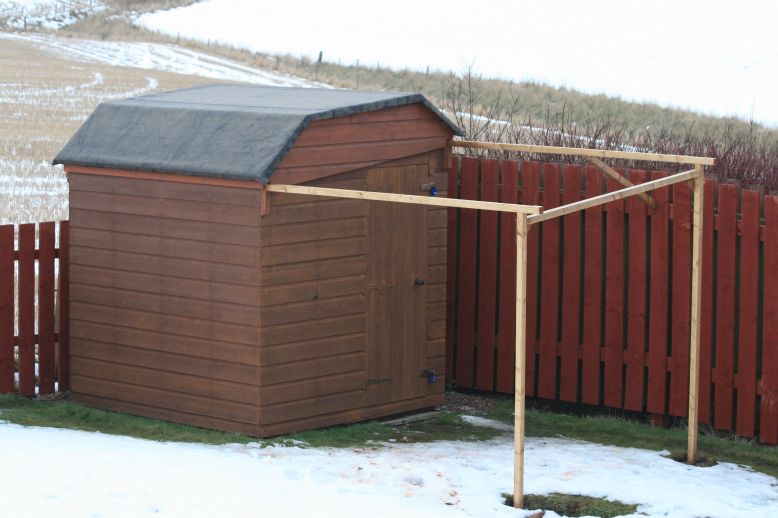 Photo : Clair Observatory with new roof (Feb 2009) |
|
|
|
||
| A new 12" LX200 telescope
had been installed into the observatory. Like the previous 8"
scope it is mounted
on a permanent 7" diameter metal pier, bolted to a concrete base.
(The pier did however require shortening in an engineering workshop in order to accommodate the taller 12" scope). Experience has shown that connectivity using 54g WIFI connection to the household LAN network and thus remote control operation of the observatory has become prone to problems since 2009 (this is somehow thought to be associated with the much larger telescope/ metal work and possibly the rolled off roof lying between house and observatory. In an attempt to solve this a TP Link Powerline Adapter (TL PA211) was installed in the observatory in Oct 2012 with another Powerline Adapter installed indoors and attached to the household router. Initial tests appear promising (more) |
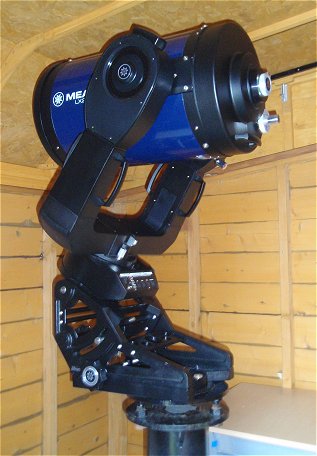
Photo : Observatory Interior with 12" LX200 Telescope / CCD Camera and equipment |
|
|
Opening the roof is performed by first removing the locking devices and dropping the gable flap followed by sliding the roof with either a push or pulling action using just a single hand. A flexi-rope chain allows the gable flap to be lowered gently to a horizontal position, whilst wooden stops prevent the roof from rolling beyond the end of the runoff beams (The new roof will be slightly quicker to open and shut than the previous roof which require manual installation of two support posts each time the observatory was used, and has the advantage that the roof does not need to be manually lifted on the one side whilst opening/closing). Closing the roof is performed fully in the observatory by pulling on two ropes - one to pull the sliding roof shut and one to lift the gable flap. A small of manual adjustment to the roof position is required to ensure that it mates appropriately with the gable end. (Small wooden guides will be added in due course to facilitate this process automatically). The observatory takes only around 5-10 minutes to open and get the telescope setup up ready for observing. Closing the observatory takes no more than 5 minutes. Both of these times are a significant improvement on the original time it took to setup (30 mins) / setdown (15 mins) in the days before I built the observatory (pre 1998), when I had to carry the tripod & wedge outdoors, carry the telescope outdoors, set in on the wedge, carry the accessories outdoors, align & level tripod, align telescope etc.
|
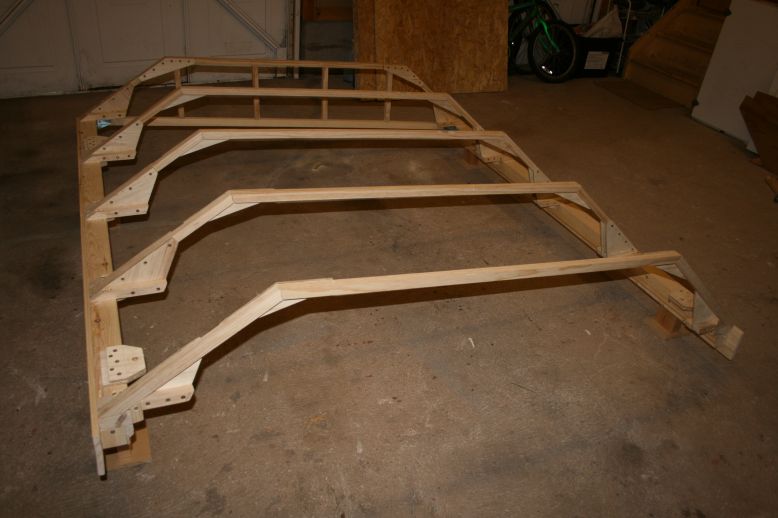
 Photo: Testing the new sliding roof (roof frame before covering with board and roof felt) |
|
The roof frame was built using 1"x1" wooden spars with triangular plywood strengtheners, set on two main beams of 1. 5/16" x 2.3/4" wood, one set 8" higher than the other corresponding to the low and high side walls of the observatory. (Normally a run-off roof would have run-off beams that are the same height, but retrofitting a horizontal sliding roof to the existing observatory structure that would also run-over the upstanding telescope demanded that the beams be at different heights) . The roof is topped by 3 sections of 13mm PJB board and covered in bitumen felt. The three sections of roof have slopes of 41 degrees (low side), 6 degrees (top) and 31 degrees (high side). The roof overlap the observatory walls by around 3" and is some 7 feet in length. The frame design incorporating the carefully strengthened spars should be sturdy to hold the roof shape despite being open at one end. however the weight the roof might eventually cause a distortion of the roof frame spars with time leading to increased separation between the two side beams with consequential problems with castor wheels tracking and closure of the gable flap. Options to retro-strength the roof spars have been considered for this eventuality. For lifting the roof on or the observatory, special wooden cross-beams are added with bolts to ensure firm rigidity of the roof during this critical operation. Whilst the roof is easy to slide with just a single hand it is overall quite heavy and cumbersome and requires 4 people to lift it onto the observatory. (The previous roof required just 2 people to install)
|
|
|
|
Photo (right) : Test fitting of the new roof. New run-off beams and support posts can be seen on the righthand side of the photo, whilst the previous roof and support posts are visible on left hand side of photo |
 |
|
|
|
Back to Top
|
The Clair observatory has been built using the same shed and pier that were used for my two previous observatories (Kingcup Observatory 2001-2003 and Hilltop Observatory 1998-2000). The observatory was designed to be capable of moving, the only thing that doesn't move is the concrete pier base. ! Photo : Clair Observatory (roof open) |
 |
|
|
|
||
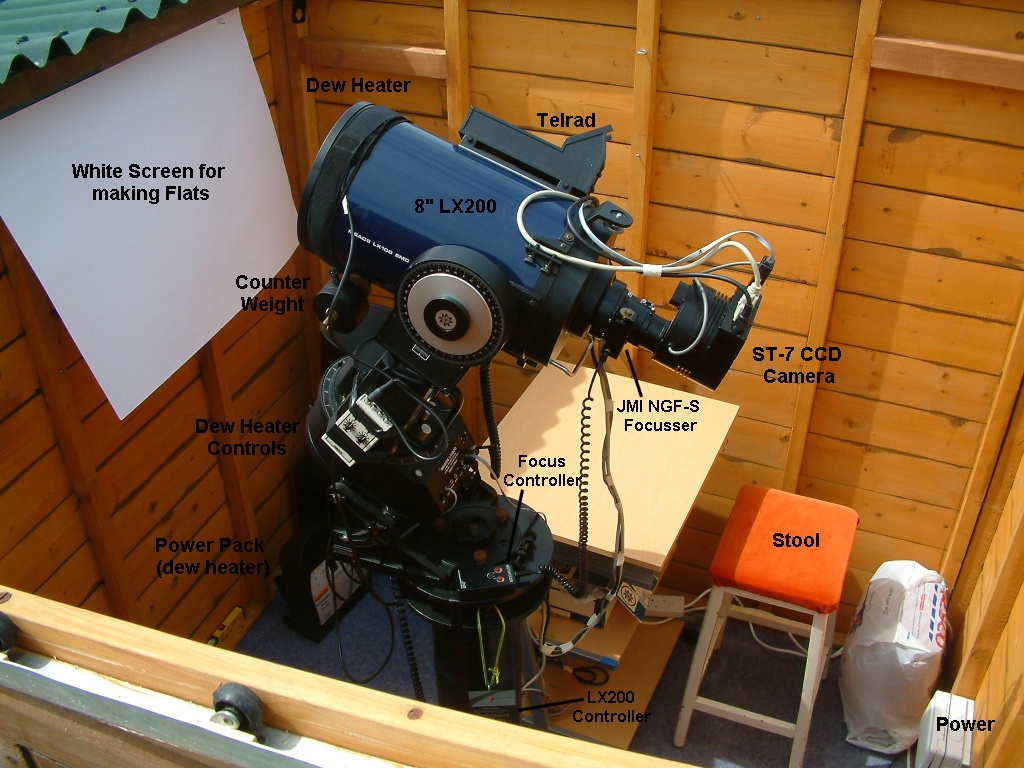
| My 8"
LX200 telescope is mounted
on a permanent 7" diameter metal pier, bolted to a concrete base. Photo : Observatory Interior with 8" LX200 Telescope / ST-7 CCD Camera and equipment (larger view) |
|
|
|
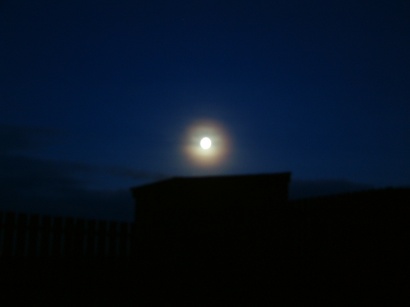
The observatory takes only around 5-10 minutes to open and get the telescope setup up ready for observing. Closing the observatory takes no more than 5 minutes. The observatory has ample room for storing the LX200's case/tripod if necessary and has sufficient room to take 1 visitor. Both of these times are a significant improvement on the original time it took to setup (30 mins) / setdown (15 mins) in the days before I built the observatory (pre 1998), when I had to carry the tripod & wedge outdoors, carry the telescope outdoors, set in on the wedge, carry the accessories outdoors, align & level tripod, align telescope etc. Photo : Moon above Clair Observatory (2005-01-25) |
|
|
|
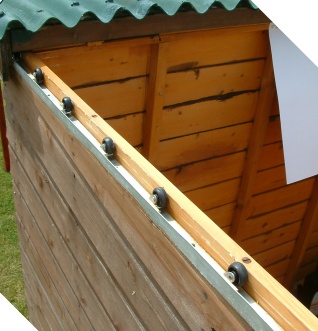
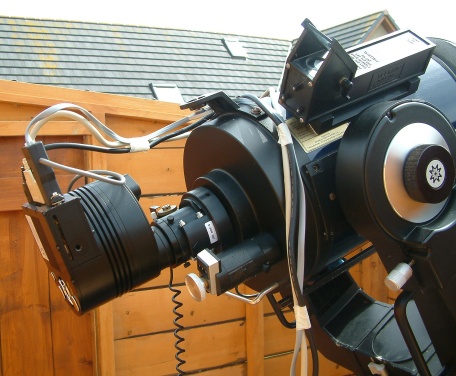
The roll-off roof was originally constructed with sets of wheels along each side of the roof. These ran along rails mounted on the top of each sidewall of the observatory and allowed the roof to be rolled-off/on. Whilst the design originally worked well, there were increasing problems with it during 2004-2005, whereby some wheels would occasionally loosen and twist, causing the roof to jam when shutting (not the most desirable event when you're tired and cold). In June 2005 remedial work was carried out to relocate the wheels into positions on the top of each sidewall, thus allowing the roof to easily roll off/on, using the sides of the roof as rails. Photo : New Wheel/Rail Design (Jun 2005) Photo (below) : 8" LX200 in Clair observatory (Front & Side Views) |
|
|

|
|
|
|
|
||
|
Clair Observatory Construction (2004) 2004-02-05 : First Light |
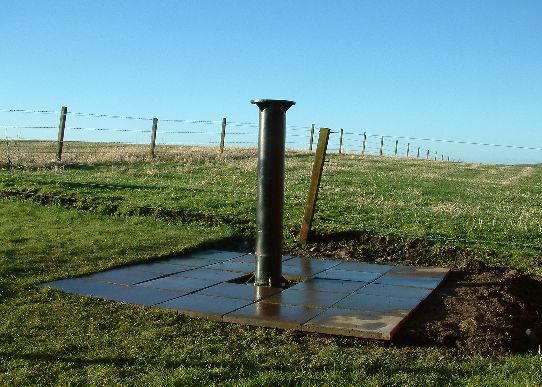 Photo: Pier & observatory base (larger) |
Back to Top
|
My roll-off roof observatory which was relocated to Dorset, England in 2000. Landscaping of our new garden and other house & garden priorities delayed the observatory's re-erection. However the telescope was finally installed in the new observatory on 2001-06-10. Originally called the 'New' Observatory, the observatory was later renamed the 'Kingcup Observatory'. The observatory was later moved back to a new site in Scotland (the Clair Observatory) The KingCup observatory was built using the same shed and pier that were used for my previous observatory (Hilltop Observatory), which were dismantled from its NE Scotland site in March 2000. The observatory was designed to be capable of moving, the only thing that doesn't move is the concrete pier base. ! The Kingcup observatory was located in the back garden of our home which then lay at the edge of a Poole in Dorset, England. The site had a somewhat limited but nevertheless reasonable sky access. The minimum viewable altitude using the telescope in the observatory are 20 deg to S, W & N, 40 deg to E (so unfortunately I couldn't see Mars in 2001 opposition). The site unfortunately suffered light pollution from a i) overlooking streetlight and local lights and ii) nearby towns of Poole and Bournemouth.
|
|
|
|
|
||
|
The following new features were incorporated into the Kingcup Observatory :
(a light blocking screen to shield off light from nearby street light, was designed but never built) |
||
|
Kingcup Observatory Construction
(2001) 2003-08-25: Observatory dismantled in preparation for move to NE Scotland. 2001-07-14: Observatory networked to house
computer permitting Remote Control operation. |
|
|
|
|
Back to Top
|
Hilltop Observatory was operational from October 1998 until March 2000 when it was dismantled in preparation
for a house move to Dorset England. The observatory was located in my back garden which lies in
a village of Westhill in NE Scotland. The observatory was initial erection of my roll-off roof shed observatory - a wooden shed construction 6' 6" x 6' 6" , with a roll-off roof, in which my LX200 telescope was mounted on a permanent 7" diameter metal pier, bolted to a concrete base. The Hilltop observatory did not have any power sockets and instead I ran an 18v lead out to the observatory from my garage at the start of each observing session. The site suffered moderate, but not overwhelming amount of light pollution. Light Pollution was worst when clouds were about, but I normally observed when skies were completely clear. |
Opening & Closing the Observatory (Click on following links in Sequence to see)
1) Bring Out Support
Legs |
||
|
|
|||
| The Hilltop Observatory made a significant difference to my observing experience. Because it took only around 10 minutes to open and setup up ready for observing. and just 5 minutes to close down at the end of a session, it meant it so match easier and pleasurable to use my telescope. Before the observatory / permanent pier, it used to take around 30 minutes to setup the scope and around 15 minutes to pack away at the end. (carry the tripod & wedge outdoors, carry the telescope outdoors, set in on the wedge, carry the accessories outdoors, align & level tripod, align telescope etc.) |
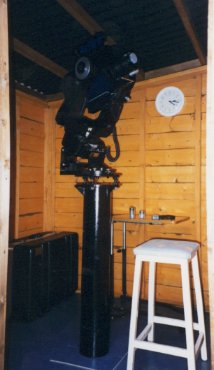 Photo : 8" LX200 in observatory |
||
|
|
|||
|
The following features were incorporated into the Hilltop Observatory :
Since I was using a 18v lead from the house/garage out to the telescope I made a reel for holding the wire when not in use and for reeling it in quickly when packing away. [ In the Kingcup and Clair Observatories I installed power leads ]
|
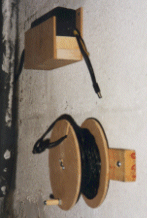
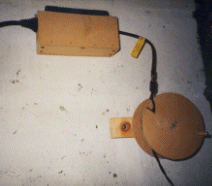 Photo: Transformer, Reel for 18v lead |
||
|
Hilltop Observatory Construction (1998) The design of the observatory and it construction is detailed on the following page : Design and Construction |
| This Web Page: | Observatory |
| Last Updated : | 2015-05-16 |
| Site Owner : | David Richards |
| Home Page : | David's Astronomy Web Site |